How to Calculate Your Home’s BTU Heating & Cooling Needs

Calculating home energy costs with spreadsheets, how to calculate your home's BTU needs

If your home never quite feels comfortable, too cold in winter, too warm in summer, or uneven from room to room, your HVAC system may not be the right size. That’s a common issue for homeowners across the Northeast, especially in older homes or houses that have been renovated over time.

Before replacing a furnace, boiler, or air conditioner, it helps to understand one critical number: BTUs. Calculating the right BTU heating and cooling capacity is the foundation of proper system sizing, better comfort, and lower energy costs.

What Is a BTU?

BTU stands for British Thermal Unit. In simple terms, it’s a measure of heat energy.
One BTU is the amount of energy needed to raise the temperature of one pound of water by one degree Fahrenheit.

For homeowners, BTUs tell you how much heating or cooling power an HVAC system can deliver. Furnaces, boilers, air conditioners, and heat pumps are all rated by BTU capacity, which helps determine whether they can keep your home comfortable under real-world conditions.

Why Accurate BTU Calculations Matter

Getting BTU sizing right isn’t about buying the biggest system you can afford—it’s about buying the right one.

Oversized systems heat or cool too quickly, then shut off before completing a full cycle. This short cycling leads to higher energy bills, uneven temperatures, excess wear on components, and reduced humidity control.

Undersized systems have the opposite problem. They run constantly, struggle to reach your set temperature, and put ongoing strain on the equipment. Over time, that can shorten system lifespan and drive up repair costs.

Accurate BTU calculations protect your comfort, your budget, and your HVAC investment.

Key Factors That Affect Your Home’s BTU Requirements
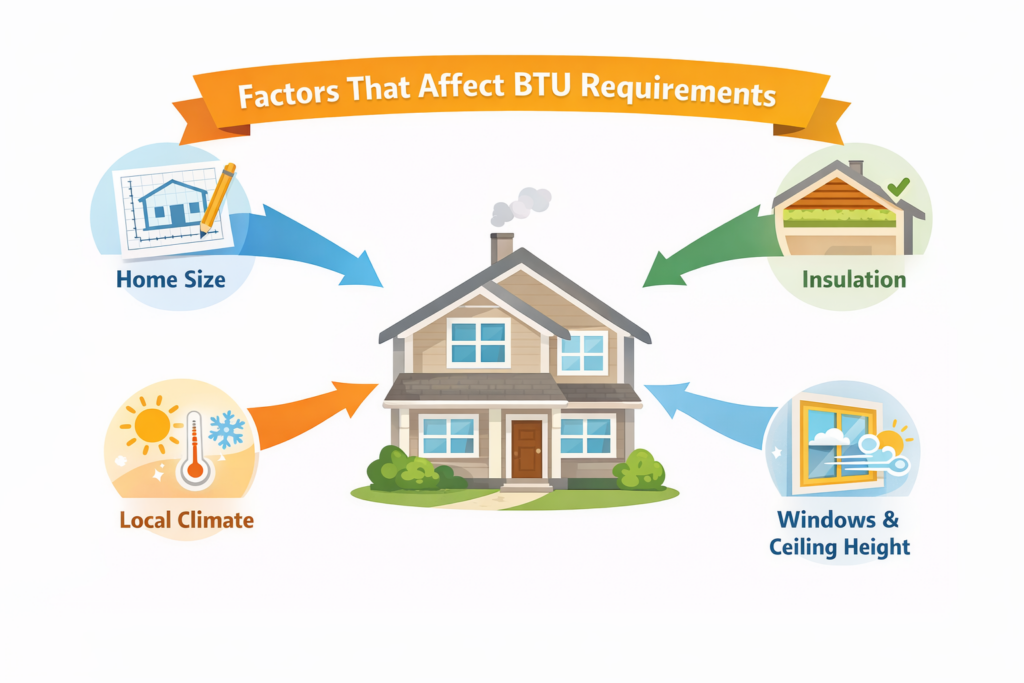
Square Footage

Square footage is the starting point for any BTU calculation. Measure all heated or cooled areas, not garages or unfinished basements unless they’re conditioned spaces.

Ceiling Height

BTUs are based on volume, not just floor area. Homes with 9-foot, vaulted, or cathedral ceilings (common throughout the Northeast) require more home heating and cooling capacity than homes with standard 8-foot ceilings.

Climate Zone

Northeast climates demand serious heating power and increasingly reliable cooling. Homes in Vermont and Massachusetts face longer, colder winters, while New Jersey, Pennsylvania, and Delaware experience higher summer cooling loads. Your location directly affects how many BTUs your system needs.

Insulation Quality

Insulation plays a major role in heat loss and heat gain. Many older Northeast homes have under-insulated walls, attics, or crawlspaces, which increases BTU requirements. Improving insulation before replacing equipment can significantly reduce the size and cost of your next system.

Windows and Doors

Windows are a major source of energy loss, especially in older homes with single-pane glass or drafty frames. Large window counts, sliding doors, and poor sealing all increase heating and cooling loads.

Home Orientation and Sun Exposure

Southern-facing homes receive more direct sunlight, which can reduce heating needs in winter but increase air conditioning demand in summer. Shade from trees or nearby buildings can offset this effect.

Occupancy and Appliances

People, lighting, cooking appliances, and electronics all generate heat. Larger households or homes with heavy appliance use require additional cooling capacity.

How to Calculate BTU Requirements: Step by Step

The Basic Formula Method

A simple BTU calculator approach starts with square footage and average BTU-per-square-foot estimates.

For Northeast homes:

  • Heating: 40–60 BTUs per square foot
  • Cooling: 20–25 BTUs per square foot

A 2,000 sq ft home typically needs:

  • 80,000–120,000 BTUs for heating
  • 40,000–50,000 BTUs for cooling

(This provides a baseline—not a final answer.)

Adjusting for Your Home’s Variables

You’ll need to adjust upward or downward based on:

  • Ceiling heights above 8 feet
  • Poor or upgraded insulation
  • High window counts or older windows
  • Local climate severity
  • Number of occupants

Each factor can increase or decrease total BTU needs by 5–30%.

Example Calculation

Consider a 2,000 sq ft colonial home in New York with 9-foot ceilings, average insulation, and 15 windows.

  • Base heating estimate: 2,000 × 50 = 100,000 BTUs
  • Ceiling height adjustment: +10%
  • Window adjustment: +10%

Adjusted heating load: approximately 120,000 BTUs

Cooling calculations would follow the same process with lower per-square-foot values.

Understanding Manual J Load Calculations

Manual J is the industry-standard HVAC load calculation method. Unlike basic BTU calculators, a Manual J evaluation considers dozens of variables, including wall construction, air leakage, duct placement, and local weather data.

DIY calculations are useful for education and planning, but when purchasing new equipment, a professional Manual J calculation ensures precise sizing. HOP Energy performs Manual J load calculations for homeowners throughout Connecticut, New York, Pennsylvania, Massachusetts, New Jersey, Delaware, Rhode Island, and Vermont.

BTU Requirements by Room Size (Quick Reference)

Room Size Approximate Square Footage Heating BTUs Needed* Cooling BTUs Needed*
Small Room 100–250 sq ft 4,000–15,000 BTUs 4,000–6,000 BTUs
Medium Room 250–400 sq ft 15,000–25,000 BTUs 6,000–10,000 BTUs
Large Room 400–600 sq ft 25,000–35,000 BTUs 12,000–15,000 BTUs
Whole Home 1,500–3,000+ sq ft 60,000–120,000+ BTUs 36,000–60,000+ BTUs

*BTU ranges assume average insulation, standard ceiling heights, and typical Northeast climate conditions. Homes with high ceilings, older insulation, or large window areas may require higher capacity.

Special Considerations for Northeast Homes

Heating BTU requirements are usually higher than cooling needs due to cold winters. It’s common (and our recommendation) to size heating and cooling equipment separately.

Multi-story homes or houses with additions often benefit from zoned systems, including ductless mini-splits, which allow different BTU capacities per area.

Older homes typically require more capacity than new construction due to less efficient building envelopes.

Using a BTU Calculator Tool

Calculating the right BTU capacity is key to year-round comfort. This calculator uses the K Factor formula—considering square footage, ceiling height, temperature increase, insulation, and climate—to estimate your heating and cooling needs.

BTU Heating & Cooling Calculator

Estimate your home’s heating and cooling needs based on square footage, ceiling height, insulation, and local climate.

If you plan to gather your measurements and calculate your BTU needs later offline, you can print out this downloadable BTU Heating & Cooling Worksheet (PDF).
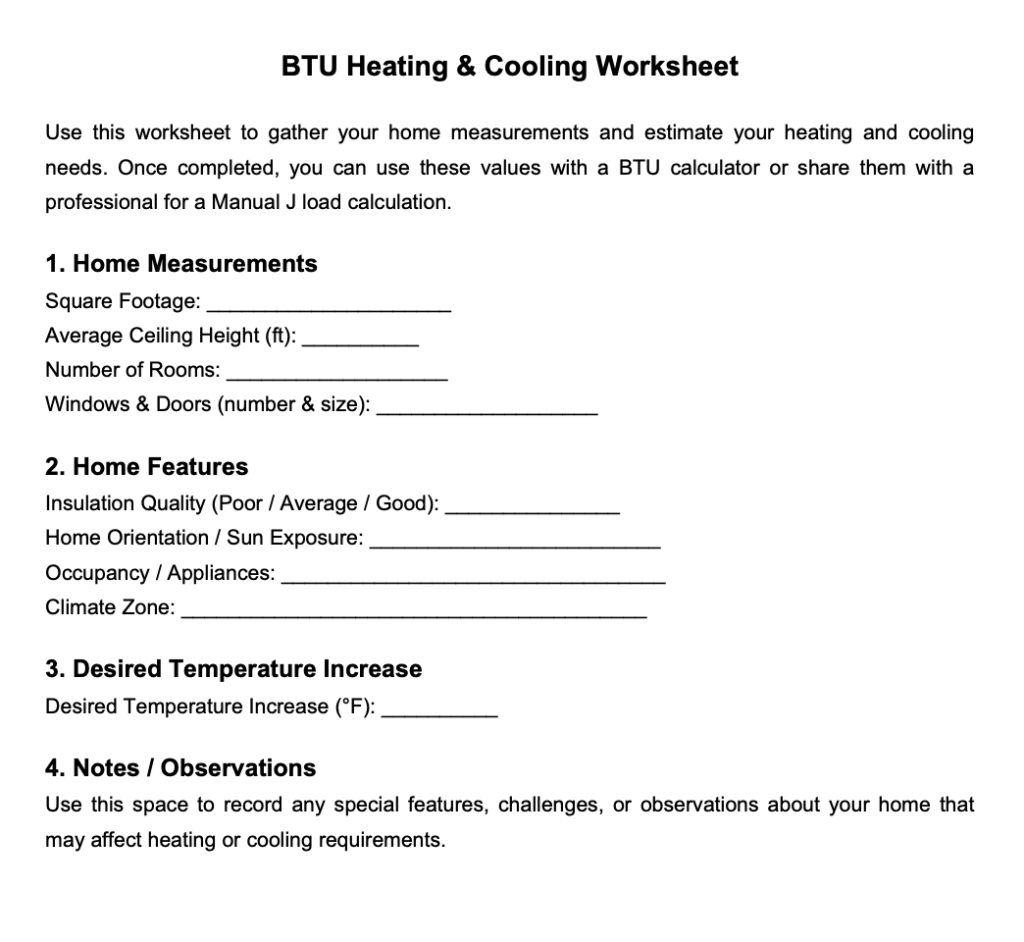
BTU heating and cooling worksheet for home measurements and features

Common BTU Calculation Mistakes to Avoid

Small oversights can lead to big comfort and HVAC efficiency problems. Avoid these common BTU calculation mistakes:
  • Using square footage alone Size is only the baseline—air volume, insulation, and layout matter just as much.
  • Ignoring ceiling height Higher ceilings mean more air to heat or cool and higher BTU needs.
  • Forgetting windows and doors Window size, quantity, and efficiency directly affect heat loss and gain.
  • Relying on generic climate data Northeast weather demands local, not national, assumptions.
  • Overlooking home improvements New insulation or windows can significantly change BTU requirements.
  • Copying existing system size Older systems were often improperly sized from the start.

When to Call an HVAC Professional

A basic BTU calculation is a helpful starting point, but some situations call for a professional assessment. It’s smart to bring in an HVAC expert if any of the following apply to your home:

  • Your home has a complex layout
    Split levels, finished basements, or multi-story floor plans can create uneven heating and cooling that simple calculations don’t fully capture.
  • You use mixed heating systems
    Homes with combinations of furnaces, boilers, heat pumps, or supplemental systems require coordinated sizing to avoid comfort gaps.
  • You’ve completed major renovations or additions
    Added square footage, finished attics, or open-concept remodels change heating and cooling loads significantly.
  • Your home has unique architectural features
    Vaulted ceilings, large window walls, sunrooms, or older construction styles can increase BTU requirements beyond standard estimates.
  • Your system struggles despite “correct” sizing
    If comfort issues persist even after careful calculations, airflow, insulation, or duct design may be the real issue.
  • You’re upgrading to high-efficiency equipment
    Whether you are buying a boiler or a furnace (or another equipment type), modern systems are more sensitive to sizing, making professional load calculations essential for performance and long-term savings.

For these scenarios, a professional load calculation ensures your system is sized correctly for your home—not just on paper, but in real-world conditions.

Frequently Asked Questions

How many BTUs per square foot do I need for heating?

Most Northeast homes require 40–60 BTUs per square foot, depending on climate and insulation.

How many BTUs per square foot for cooling?

Cooling needs usually range from 20–25 BTUs per square foot.

Is BTU sizing the same for furnaces, boilers, and AC units?

BTU ratings apply to all, but efficiency and delivery methods differ by system type.

Does fuel type affect BTU calculations?

BTU needs stay the same, but efficiency varies between heating oil, propane, and other fuels. Learn more about heating oil systems and propane heating.

What’s the difference between input and output BTUs?

Input BTUs measure fuel consumption; output BTUs reflect usable heat after efficiency losses.

Should I round up or down when choosing a size?

Avoid rounding up unnecessarily. Proper sizing beats excess capacity every time.

What is a Manual J load calculation and do I need one?

Manual J is the industry standard method for calculating a home’s actual heating and cooling load. It accounts for insulation, window size and orientation, ceiling height, air leakage, duct location, local design temperatures, and internal heat gain. Two homes of identical square footage can have very different loads.

Square footage estimates are useful for sanity-checking a quote. For new construction, a major renovation, or any home where the current system has never worked properly, ask for the calculation and ask to see the report.

What happens if my system is oversized?

It short cycles, meaning it runs in brief bursts and shuts off before completing a full cycle. On the cooling side that leaves the house cold but clammy, because removing humidity requires runtime the system never gets.

On the heating side, short cycling causes temperature swings, uneven room-to-room comfort, and extra wear from repeated starts. Oversizing is by far the more common sizing error, and bigger is not a safety margin.

Can I use the same BTU calculation for heating oil, propane, and natural gas?

Yes. Your home’s heat load doesn’t change with fuel type, but efficiency does. Oil, propane, and gas systems deliver heat differently, so factor in each system’s efficiency when sizing equipment.

Get a Professional Load Calculation from HOP Energy

BTU calculators provide insight, but professional load calculations deliver confidence. HOP Energy combines decades of regional experience with precise sizing to ensure your system is efficient, comfortable, and built for Northeast conditions. 

We offer multi-fuel capabilities, including heating oil and propane HVAC systems, plus heating oil delivery (and propane delivery in some locations).

Contact us to schedule a professional HVAC load calculation today and take the guesswork out of heating and cooling your home.

How to Detect and Prevent Frozen Pipes in Winter

Winter in the Northeast brings beautiful snow-covered landscapes … and the very real threat of frozen pipes. When temperatures drop below freezing, the water inside your pipes can freeze, expand, and cause thousands of dollars in damage. The good news is that a little prevention goes a long way to prevent frozen pipes.

Why Frozen Pipes Are a Big Deal

When water freezes, it expands by about 9%. That might not sound like much, but inside a rigid pipe, that pressure can reach thousands of pounds per square inch. This pressure causes burst pipes, water damage, and emergency repair bills that nobody wants to deal with in the middle of winter.

How to Tell If Your Pipes Are Frozen

Catching frozen pipes early can prevent them from bursting. Here are the warning signs:

Reduced Water Flow: Turn on your faucets. If you get a trickle instead of normal water pressure, or no water at all, you likely have a frozen pipe somewhere in the line.

Frost on Exposed Pipes: Check visible pipes in unheated areas like your basement, crawl space, or garage. If you see frost or ice on the outside of the pipe, that’s your confirmation.

Strange Smells: A complete blockage from ice can cause water and waste to back up, creating unpleasant odors from your drains.

Unusual Sounds: Gurgling, clanking, or whistling when you turn on faucets can indicate ice blockages disrupting normal water flow.

Cold Spots on Walls: Feel along exterior walls, especially near plumbing fixtures. An unusually cold patch might indicate a frozen pipe behind the drywall.

If you notice any of these signs, act quickly. Turn off your main water supply and call an emergency plumber right away to minimize potential damage.

How to Prevent Pipes from Freezing Inside Your Home

Let Faucets Drip

Moving water is much harder to freeze than standing water. During extreme cold snaps, let faucets connected to exposed pipes drip slightly—even a trickle helps. Yes, it wastes a bit of water, but that’s nothing compared to the cost of burst pipe repairs.

Keep Your Home Warm

It’s tempting to lower the thermostat when you’re away to save money, but don’t go below 55°F during winter. This is especially important for pipes in exterior walls or unheated spaces. Open cabinet doors under sinks to let warm air circulate around the plumbing.

Seal Air Leaks

Cold air sneaking in through cracks and gaps can freeze nearby pipes. Check around pipes where they enter your home, and seal any openings with caulk or foam insulation. Don’t forget to inspect areas around dryer vents, electrical wiring, and window frames.

Keep Interior Doors Open

Closed doors can trap cold air in bathrooms and other rooms with plumbing. Keep interior doors open to maintain consistent temperatures throughout your home, especially in rooms with exterior walls.

Schedule Heater Service

If you have been having home heating issues that are making you worry for your pipes, please give us a call. We’ll be happy to come out and fix up that furnace or boiler (provided that you live in one of the areas we service). 

How to Keep Pipes from Freezing Outside and in Crawl Spaces

Here’s how to insulate outside water pipes from freezing and protect vulnerable areas like crawl spaces:

Insulate Exposed Pipes

Pipes in unheated areas like crawl spaces, attics, and garages are your most vulnerable spots. Wrap them with foam pipe insulation sleeves—they’re inexpensive, easy to install, and highly effective. For maximum protection, use insulation with a thickness of at least 3/8 inch.

Heat Tape for High-Risk Areas

For pipes that freeze repeatedly, consider heat tape or heat cable. These electrical products provide consistent warmth along the pipe length. Just make sure to follow manufacturer instructions carefully—improper installation can create fire hazards.

Disconnect and Drain Outdoor Faucets

Before the first freeze, disconnect garden hoses and drain outdoor faucets. If you have shut-off valves for exterior faucets inside your home, close them and then open the outside faucet to drain any remaining water.

Insulate Crawl Space Vents

Crawl spaces are notorious trouble spots. Close foundation vents during winter to keep cold air out, and consider adding insulation to crawl space walls. Some homeowners also use temporary plastic sheeting as an extra barrier against frigid air.

Protect Pipes in the Crawl Space

For crawl space pipes specifically, a combination approach works best: foam pipe insulation plus ensuring the space itself stays above freezing. You might need to add a small space heater (designed for crawl space use) during extreme cold, or improve overall insulation in the area.

After protecting all your pipes, check out our blog post Top 5 Tips to Stay Warm Inside and Protect Your Home, which offers a few more tips for winterizing your home.

Which Pipes to Cover During a Freeze

Not all pipes need the same level of attention. Focus your efforts here:

High Priority:

  • Pipes in exterior walls facing north or northwest (these get the least sun)
  • Pipes in unheated crawl spaces and attics
  • Outdoor faucets and hose bibs
  • Pipes in unheated garages

Medium Priority:

  • Pipes in basements along exterior walls
  • Pipes near windows or vents
  • Pipes in rooms that aren’t regularly used

Lower Priority:

  • Pipes in heated, insulated spaces
  • Interior plumbing surrounded by conditioned air

When in doubt, more insulation never hurts. The cost of materials is minimal compared to repair bills.

What to Wrap Pipes With to Keep Them from Freezing

You have several good options for pipe insulation:

Foam Pipe Sleeves: These pre-slit tubes slip over pipes easily and provide excellent insulation. They’re available in various diameters at any hardware store. Look for sleeves at least 3/8 inch thick for best results.

Fiberglass Pipe Wrap: Similar to the insulation in your walls, fiberglass wrap offers great thermal protection. It requires a bit more effort to install but works well for odd-shaped pipes or tight spaces.

Heat Tape or Heat Cable: For pipes that freeze despite insulation, electric heat tape maintains a constant temperature. Choose self-regulating heat tape that adjusts output based on temperature (it’s safer and more energy-efficient).

Pipe Heating Cable: Similar to heat tape but designed for longer runs. Wrap it around the pipe in a spiral pattern, then cover with foam insulation for double protection.

Temporary Solutions: In a pinch, old towels, newspapers, or even pool noodles split lengthwise can provide short-term insulation. These aren’t ideal for all winter, but they’re better than nothing during a cold snap.

What Not to Use: Avoid materials that trap moisture against the pipe like cloth without waterproofing, or anything flammable near heat sources.

Whatever you choose, make sure to cover the entire length of vulnerable pipes, including elbows and joints where cold can penetrate more easily.

Frequently Asked Questions

What temperature will freeze pipes?

Pipes typically start freezing around 20°F, especially in unheated spaces or when exposed to wind. But the risk kicks in anytime it’s below 32°F if your pipes aren’t insulated or if the cold sticks around for a while.

Can I use a space heater to prevent frozen pipes?

Yes, but be careful. Use a heater rated for basements or crawl spaces, never leave it unattended, and keep it away from anything flammable. It’s a solid backup option during extreme cold.

What should I do if my pipes are already frozen?

Find the frozen section (it’ll feel coldest), keep the faucet open, and apply gentle heat with a hair dryer, heating pad, or warm towels. Never use open flames or torches—they can damage pipes or worse. If you can’t find the freeze or if a pipe bursts, shut off your main water valve and call a licensed plumber right away.

Will leaving cabinet doors open really help?

It really does. Open cabinet doors let warm air reach the pipes under your sinks, especially important for exterior walls. Simple move, big impact.

Do I need to worry about PEX pipes freezing?

PEX is tougher than copper or PVC and can expand a bit without bursting, but it’s not freeze-proof. The water inside can still freeze and block flow, and repeated freeze-thaw cycles will eventually cause damage. Bottom line: still insulate them.

The Bottom Line on Detecting & Preventing Frozen Pipes

If you’ve discovered frozen pipes, visible ice damage, or you’re dealing with a burst pipe emergency, it’s time to call a plumber. 

If your pipes haven’t frozen yet, you still have time to take preventive measures like installing heat tape, improving insulation in vulnerable areas, or upgrading to frost-proof outdoor faucets. Putting in a little work now can save you from major headaches when the next cold snap hits.

While frozen pipes require a licensed plumber, the best defense is keeping your home properly heated. Contact our home heating experts to ensure your heating system is ready for winter.

Why Is My Water Heater Making Noise?

Is your water heater suddenly sounding like a percussion instrument? Don’t worry, you’re not alone. While some water heater sounds are perfectly normal, others signal that your system needs attention. Let’s break down what those mysterious rumbles, pops, and hisses really mean.

Understanding Water Heater Sounds

Your water heater will make some noise during normal operation—that’s just part of the job. But certain sounds are your system’s way of telling you something’s wrong. Whether it’s harmless thermal expansion or efficiency-killing sediment buildup, figuring out the source is the first step to fixing it.

What Different Water Heater Noises Mean

Here’s a quick reference guide to help you identify what your water heater is trying to tell you:

Noise Type What It Sounds Like Likely Cause
Popping or Rumbling Like popcorn cooking or distant thunder Sediment buildup on the tank bottom heating and releasing
Hissing Steam escaping or a tire deflating Water dripping onto hot surfaces or a pressure relief valve issue
Whistling High-pitched tea kettle sound Restricted water flow through a partially closed valve
Knocking or Hammering Loud banging in walls or pipes Water hammer from sudden pressure changes
Beeping Electronic alarm tone Low battery in the controller or system error code
Sizzling Bacon frying sound Water leaking onto hot components

Why Do Water Heaters Make Noise?

Let’s take a closer look at the most common causes of a noisy water heater, so you can get to the bottom of what’s causing all that hissing, whistling, knocking, or popping. 

Sediment Accumulation

Minerals from your water settle at the bottom of the tank over time. When the heating element fires up, it superheats this layer and creates those popping sounds. Beyond being annoying, sediment makes your system work harder and shortens its life.

Pressure Problems

If water pressure gets too high, your T&P relief valve releases it with a hissing sound. That’s actually a good safety feature, but if it’s happening often, your pressure needs adjusting.

Loose Components

Heating elements can work loose over time, causing rattling or buzzing. It’s not an emergency, but ignoring it can lead to a failed element down the road.

Temperature Settings

Cranking your water heater above 120°F creates more boiling and steam, which makes noises louder. It also speeds up sediment buildup and increases the risk of scalding.

Why Do Water Heaters Make Noise?

Here are some steps you can take if your water heater is making noise, but only if you’re comfortable. When in doubt, call a professional.

Problem DIY Solution When to Call a Pro
Popping from sediment Drain and flush the tank annually If you haven't flushed in years or sounds persist
Whistling sounds Check that all valves are fully open If the sound continues after adjusting valves
Hissing from T&P valve Test the valve by lifting the lever slightly If the valve continuously drips or won't reseat
Beeping alarm Replace the controller battery If water heater beeping continues after battery replacement
Knocking in pipes Install water hammer arrestors For persistent hammering or if unsure of the cause
Loose element buzzing Turn off power and tighten element bolts If you're uncomfortable working with electrical components

Important Safety Note: Always turn off power to electric water heaters and shut off the gas supply to gas models before performing any maintenance. If you’re uncertain about any repair, contact our experienced technicians for professional service.

Prevention: Keeping Your Water Heater Quiet

The best way to avoid noisy water heaters is to stay on top of maintenance. Flush your tank annually to clear out sediment, and check your anode rod every few years to prevent corrosion.

If you have hard water, a water softener can make a huge difference in reducing mineral buildup. Also, keep your water pressure between 40-80 PSI—this protects your water heater and your whole plumbing system.

Is your unit pushing 10-15 years old and acting up more often? Replacement might actually save you money compared to constant repairs. Plus, newer models run quieter and more efficiently. Check out our water heater installation services to see what’s available.

Frequently Asked Questions

Is a noisy water heater dangerous?

Most of the time, no. Light popping or occasional hissing is pretty normal, especially if you have hard water. But if you hear loud banging, continuous hissing from the relief valve, or beeping alarms, don’t wait: those can signal pressure issues or failing parts that need immediate attention.

How do I stop my water heater from making noise?

Flushing your tank is your best first move. This clears out sediment and fixes most popping sounds. Also check that your valves are fully open and your temperature is set at 120°F or below. If the noise continues, give us a call so we can pinpoint the real problem.

What does it sound like when your water heater is going out?

If you hear a lot of rumbling or popping that keeps getting louder, that’s sediment building up over time. Sizzling sounds often mean water is leaking onto hot parts. You might also notice your heater running constantly but not performing as well. Add rusty water or visible corrosion to the mix, and it’s probably time for a replacement.

What does it mean if my water heater is knocking or banging in the pipes?

That is usually water hammer, and it is a plumbing issue rather than a water heater problem. It happens when a valve closes quickly and the moving water has nowhere to go, sending a shock through the pipes.

The distinction matters because flushing the tank will not fix it. Water hammer is addressed with an arrestor or by correcting pressure, and leaving it alone lets the repeated shock loosen joints over time.

Why does my water heater hum or vibrate?

On an electric unit, humming usually means a heating element has loosened and is vibrating as water moves past it. It is a minor repair and not dangerous.

A vibration you can feel through the floor or nearby piping deserves a closer look, since it can also point to loose mounting or a component working its way out of position.

How often should I flush my water heater?

Once a year is the standard recommendation. If you have hard water, twice a year is better, because minerals settle faster and harden sooner.

The schedule matters more than most people realize. Sediment that gets flushed out regularly stays loose and rinses away easily. Sediment left to bake against the burner turns into a hard crust that a standard flush will not touch.

What if flushing does not stop the noise?

That usually means the sediment has hardened into scale bonded to the bottom of the tank. Loose sediment rinses out. Baked-on scale does not.

At that point the options are a professional descaling treatment or replacement, and which one makes sense depends heavily on the age of the unit. A five-year-old tank is worth descaling. A twelve-year-old tank that is also losing capacity is telling you something.

What is an anode rod and why does it matter?

The anode rod is a sacrificial metal rod inside the tank that corrodes so the tank lining does not. It is the single most overlooked component in a water heater.

It connects to noise indirectly. Once the rod is spent, corrosion moves to the tank itself, and rust flakes add to the sediment already causing the popping. Replacing the rod every few years is inexpensive and is the closest thing there is to extending a tank’s life on purpose.

When to Call a Professional

Some water heater noises are easy DIY fixes, but others need a pro. If you’re hearing persistent unusual sounds, spotting water around your tank, or just want the peace of mind that comes with a thorough inspection, we’ve got you.

We serve homeowners throughout the Northwest with comprehensive HVAC services, including water heater repair, maintenance, and replacement. Don’t lose any more sleep over a noisy water heater––reach out to us for fast, reliable service.

How to Prevent Heating Oil From Gelling in Cold Weather

If you live in the Northeast, you already know winter doesn’t play nice. And while your heating system can handle the chill, your heating oil isn’t quite as tough. When temperatures drop, heating oil can gel, or even “freeze,” leading to clogs, system shutdowns, and some very unwelcome chills indoors.

Here’s how to keep your heating oil flowing so your home stays cozy all winter long.

Q: What Is Heating Oil Gelling?

A: Heating oil gelling happens when the paraffin wax naturally found in home heating oil begins to solidify as temperatures fall. Once this wax thickens, it can clog filters, lines, and nozzles, preventing your system from getting the fuel it needs.

When there is oil gelling, you might notice your furnace struggling to start, short-cycling, or shutting down entirely. None of these are things you want to troubleshoot in sub-zero weather, which is why prevention is key.

Q: What Temperature Does Home Heating Oil Gel?

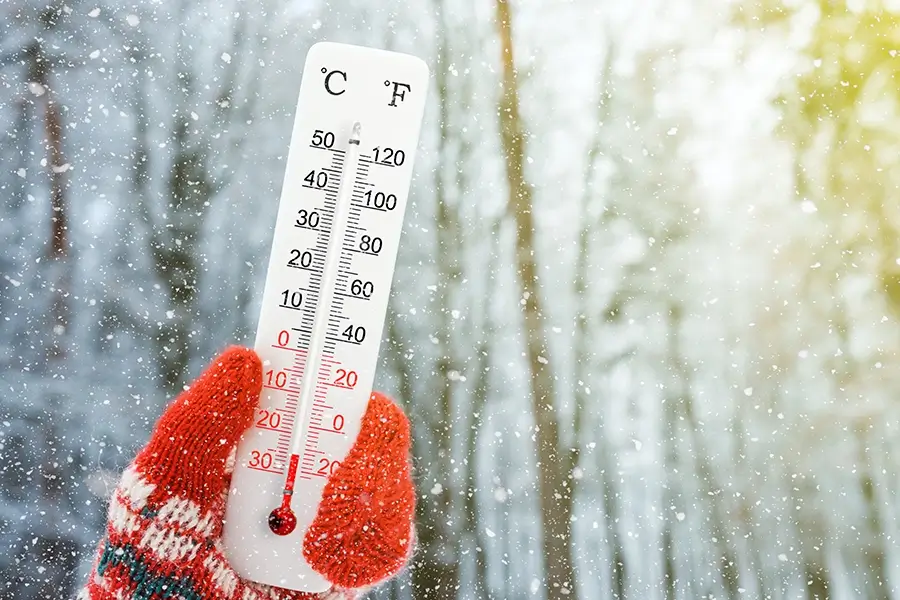
A: Typically, No. 2 home heating oil starts to gel at around 15°F to 20°F. But the exact temperature can vary based on the oil blend, storage conditions, and your heating oil tank setup. If your tank is outdoors or above ground, it’s far more vulnerable than one in a basement or sheltered area.

Some homeowners in colder regions use a blended fuel, mixing No. 2 heating oil with No. 1 kerosene, which has a lower freezing point and helps prevent gelling naturally.

Thermometer in freezing weather, how to prevent heating oil gelling

Q: How to Keep Heating Oil From Gelling?

A: You don’t have to wait for a blizzard to protect your heating oil. A few proactive steps can make all the difference:

  1. Add a heating oil anti-gel additive
    Using a heating oil anti-gel additive before temperatures drop is one of the easiest and most effective ways to prevent gelling. These additives lower the oil’s freezing point, improve flow, and help your system run smoothly even in deep winter.
  2. Keep your tank full
    A fuller tank means less empty air space and less condensation. This can lead to water buildup, which is a major culprit in freezing issues. Make sure you top off before the next cold front hits.

  3. Insulate or shelter your oil tank
    If your tank is outdoors, consider adding insulation or a small shelter around it. Even a basic windbreak can help maintain temperature stability.

  4. Schedule regular maintenance
    Annual heating system tune-ups keep your filters clean and your fuel lines clear, reducing the chance that thickened oil will cause blockages. If you want to stay ahead of any heating oil issues, you can purchase a Heating Protection Plan through HOP, which includes routine maintenance for your oil tank system.. 

Q: What Is the Best Anti-Gel Additive for Home Heating Oil?

A: There’s no one-size-fits-all additive, but look for products designed specifically for home heating oil, not diesel or automotive use. A good additive will:

  • Prevent wax crystals from sticking together
  • Reduce water buildup in your tank
  • Improve cold-weather fuel performance

Your HOP Energy technician can recommend and apply a professional-grade additive that’s tested for your system and local climate conditions, no guesswork required.

Q: Can Heating Oil Freeze in the Winter?

A: Technically, heating oil doesn’t “freeze” solid like water. Instead, it thickens and gels, eventually becoming too viscous to pump. Once that happens, your system can’t draw fuel, and you’ll likely need a technician to warm or replace the oil before restarting your burner.

If you ever find your system not running and suspect gelling, don’t try to fix it yourself; call HOP Energy. Our Emergency Services Team will safely diagnose the issue and get your heat back on fast.

Stay Ahead of Winter With HOP Energy

Cold weather can be unpredictable, but your comfort doesn’t have to be. Whether it’s automatic oil delivery, professional tank treatments, or 24/7 emergency service, HOP Energy keeps your system running efficiently year-round.

Contact your local HOP Energy office today to schedule your next heating oil delivery, or even order heating oil online and set up automatic delivery. This way, you can count on a warm and cozy cold season, no matter how low the temperature drops.

Why Upgrading to a Double-Walled Heating Oil Tank Matters

Homeowners across the Northeast rely on heating oil to stay warm through long winters. But while the heating system often gets the attention, the oil tank itself plays just as critical a role. Aging or single-wall tanks can corrode and leak over time, posing environmental hazards and incurring expensive cleanup costs. Upgrading to a double-walled heating oil tank is one of the most effective ways to protect your property, comply with evolving regulations, and ensure long-term heating reliability.

Table of Contents

What is a Double-Walled Heating Oil Tank?

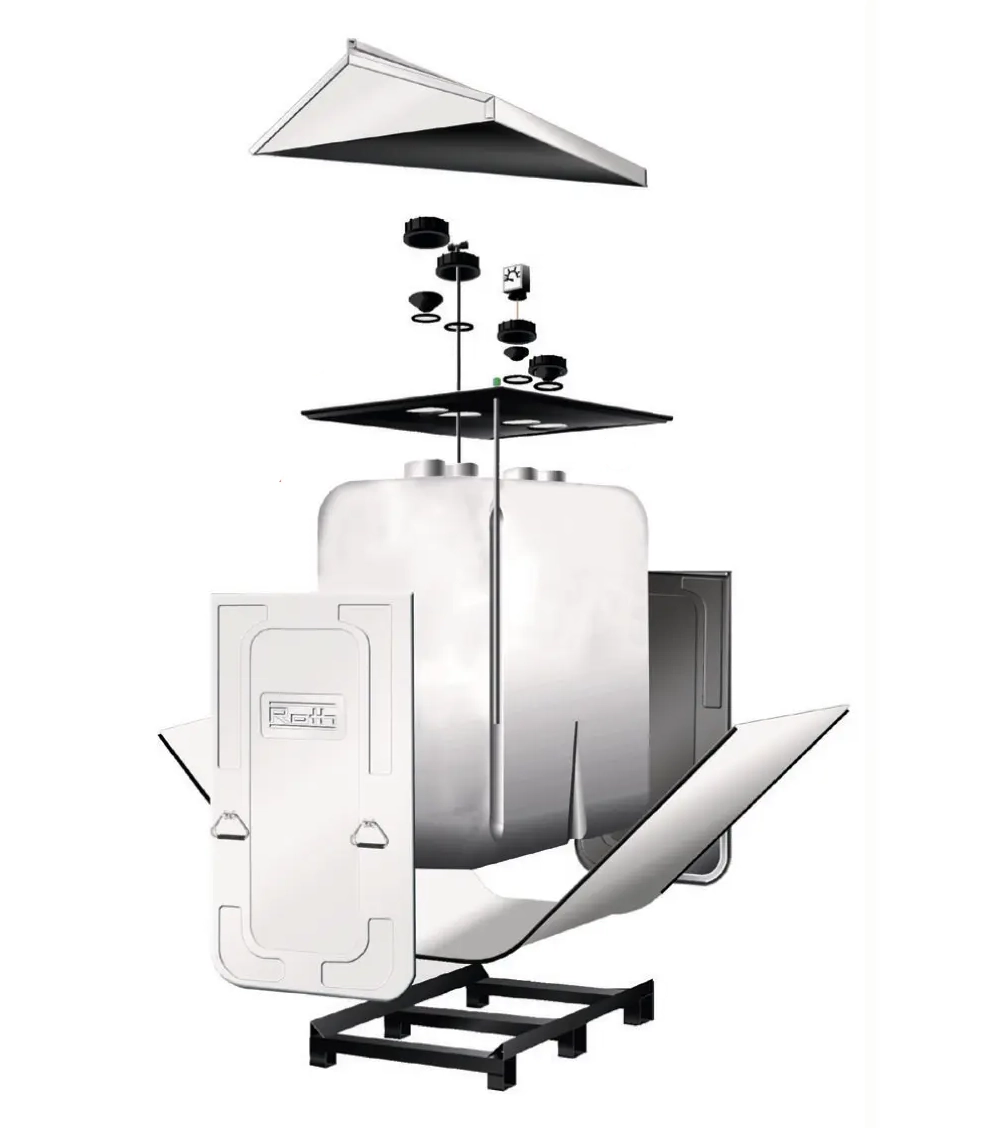
A double-walled heating oil tank features an inner tank (that holds the oil) and an outer shell that serves as secondary containment. The space between the two walls, known as the interstitial space, is designed to contain any leaks or breaches in the inner wall.  

Key mechanics:

  • Inner tank holds the fuel.
  • Outer tank surrounds it, ready to catch any potential leakage from the inner tank.
  • The interstitial space may include leak detection devices (gauges, alarms) and sometimes a “spill bucket.”

Because of this design, the outer shell functions as built-in containment, reducing the need for other external containment measures.

Benefits of Double-Walled Heating Oil Tanks

  • Better leak protection – If the inner tank fails, the outer wall helps prevent fuel from escaping into soil, groundwater, or building interiors.
  • Built-in containment – Some single-wall tanks require additional external containment systems; double-walled units integrate that layer.
  • Durability & peace of mind – Some models use corrosion-resistant materials; fewer worries about seepage or environmental cleanup down the road.
  • Regulatory alignment – Upgrading can help you meet modern standards for fuel storage safety.

What Homeowners Should Do

If your current heating oil tank is more than 15 to 20 years old, showing signs of rust, or made from uncoated steel, it’s worth evaluating replacement options now. When upgrading, ensure the tank is installed on a level base, properly vented, and equipped with a monitoring system for the interstitial space. Homeowners should also review manufacturer specifications, warranty coverage, and insurance requirements, since

The Bottom Line

Switching to a double-walled heating oil tank is about more than hardware — it’s about safety, compliance, and environmental responsibility. With stricter regulations emerging across the Northeast, this upgrade provides peace of mind and future-proofs your home’s heating system. By investing in a tank that meets modern standards, homeowners can reduce risk, simplify compliance, and ensure reliable performance for years to come.

Boiler vs. Furnace: What Are the Differences? 

boiler maintenance

Choosing the right heating system is a critical decision for homeowners, especially in regions where winter weather demands reliability and efficiency. Boilers and furnaces are the two most common systems, and while both effectively warm your home, they operate very differently. 

Understanding how they work, and how factors like energy efficiency, fuel type, and installation cost vary, can help you make the best choice for your home and budget.

Table of Contents

How They Work

Boiler:
A boiler heats water and circulates either hot water or steam through pipes and radiators to distribute radiant heat. This system uses water as the heat conductor, creating an even warmth throughout the home without drying out the air. 

Boilers can run on natural gas, oil, electricity, or propane. Many modern propane boilers are highly efficient, making them a great choice for homes without access to natural gas. Some systems can also provide domestic hot water, eliminating the need for a separate water heater.

Furnace:
A furnace heats air and pushes it through a system of ducts using a blower motor. The heated air then enters rooms through vents. Furnaces can be powered by natural gas, propane, heating oil, or electricity, with propane furnaces being especially popular in rural areas. 

Because furnaces rely on forced air, they heat quickly but may cause uneven temperatures and dry air if not properly maintained.

Key Differences Between Boilers and Furnaces

Key Differences

Feature
Boilers
Furnaces
Energy Efficiency
Generally more efficient due to water’s superior heat retention. AFUE ratings range from 80%–95%.
Can reach up to 98% AFUE, but air loses heat as it moves through ducts.
Comfort
Even, radiant heat that doesn’t dry air or circulate dust.
Quick heating but can cause drafts and dry air.
Installation & Cost
Higher upfront installation cost; lower monthly operating costs.
Lower upfront cost; higher maintenance needs over time.
Maintenance
Annual inspection; leaks can be costly.
Filter changes every 1–3 months plus annual service.
Versatility
Can also provide hot water.
Can pair with central AC for year-round comfort.

The Biggest Differences

The most significant difference between a boiler and a furnace is the heating method: boilers use water or steam, while furnaces use air. This impacts not only comfort and humidity, but also long-term efficiency.

Boilers deliver steady, radiant warmth that feels comfortable and even, while furnaces heat air quickly but may create temperature fluctuations between rooms.

How Each System Heats Your Home

  • Boilers distribute heat through radiators, baseboard units, or in-floor radiant tubing. Because heat is transferred through water, it’s slower to rise and longer to cool, which is ideal for consistent, comfortable warmth.
  • Furnaces distribute heat through ducts and vents. Air warms fast but cools quickly when the blower stops, creating a less consistent feel.

If you’re using propane to power your system, consider your tank size:

  • 100-gallon tanks are typically used for supplemental or smaller-space heating.


  • 250–500-gallon tanks suit average-sized homes using propane for both heating and appliances.


  • 1,000-gallon tanks may be required for larger homes or properties with multiple propane systems (furnace, water heater, range, etc.).

Your HOP Energy technician can help determine the right propane tank size for your home’s heating system.

Boiler vs. Furnace Comparison Chart

Feature
Boilers
Furnaces
Upfront Installation Cost
Higher
Lower
Energy Efficiency
Higher
High but variable
Maintenance
Less frequent, annual inspection
Frequent, monthly filter changes
Comfort
Even heat, no air dryness or drafts
Quick heating, but potential for drafts and air dryness
Lifespan
20–30 years
15–20 years
Air Quality
No air circulation, cleaner air
Can circulate dust and allergens

Pros and Cons

Boilers - Pros

  • Consistent, radiant heat and excellent comfort
  • Can also heat domestic water
  • Energy-efficient and quiet operation

Boilers - Cons

  • Higher upfront cost
  • Slower to heat
  • Potential water leak risk

Furnaces - Pros

  • Lower initial installation cost
  • Heats rooms quickly
  • Easily integrates with central air conditioning

Furnaces - Cons

  • Requires frequent maintenance
  • Can circulate dust and allergens
  • Less efficient heat retention than boilers
Technician servicing a heating unit, boiler vs furnace differences

Maintenance Requirements

Boilers:
Require annual professional inspections and occasional pressure checks. They typically need fewer service visits than furnaces, though leaks can be expensive if ignored.

Furnaces:
Need regular filter replacements every 1–3 months, annual cleaning, and blower inspections. Neglecting maintenance can lead to airflow issues and efficiency loss.

Setting up a HVAC maintenance plan with a trusted heating and cooling company makes it easy to stay on schedule and extend the life of your heating system.

Energy Efficiency

Boiler vs. Furnace Efficiency:

Boilers often edge out furnaces in long-term efficiency because heating water takes less energy than heating air. High-efficiency boilers have AFUE ratings between 90% and 95%, while gas and propane furnaces can reach up to 98% AFUE.

However, duct losses can reduce furnace efficiency by 10–15%. In contrast, boilers deliver heat directly to radiators or radiant systems, minimizing waste.

Can You Replace One With Another?

Yes. but it’s not always simple. Switching from a furnace to a boiler (or vice versa) typically requires new infrastructure:

  • A boiler system needs pipes, radiators, or radiant floor loops.
  • A furnace system needs ducts and vents.

If your home already has ductwork, upgrading to a high-efficiency gas or propane furnace may be most cost-effective. Homes without ducts often benefit more from a modern boiler system.

Furnace vs. Boiler Monthly Cost

When comparing the monthly cost of a furnace vs. a boiler, the key factors are fuel price, system efficiency, and home size.

  • Furnaces are less expensive to install but can have higher ongoing energy bills, especially in older homes with leaky ductwork.
  • Boilers may cost more upfront but usually have lower monthly fuel costs due to superior heat retention.

If you’re using propane, larger fuel tanks (500+ gallons) can often lock in lower per-gallon pricing, reducing your overall monthly heating expenses.

Which Is Right for You?

When deciding between a boiler and a furnace, it helps to consider the factors that matter most to your home and climate:

Climate: In colder regions, boilers are often preferred for their ability to deliver steady, radiant heat that keeps every corner of the home warm. In milder climates, furnaces may be more practical, as they heat air quickly and can bring your home to a comfortable temperature faster.

Home Size & Layout: Larger homes or those with radiant heating systems often benefit more from boilers. Smaller homes, and especially those already equipped with ductwork, are typically better suited for furnaces.

Existing Infrastructure: If your home already has ductwork, a furnace installation is usually more straightforward and cost-effective. For homes without ducts, a boiler system can be the smarter investment since it eliminates the need for expensive retrofitting.

Fuel Source & Efficiency: Homeowners with propane heating systems can choose between propane furnaces and boilers, both of which come in different efficiency ratings and tank sizes. Larger propane tanks (250–500 gallons) work best for whole-home heating, while smaller tanks may be sufficient for supplemental or zoned systems.

Ultimately, choosing between a boiler and a furnace comes down to your home’s infrastructure, energy source, and comfort preferences. Boilers tend to provide more consistent, energy-efficient heat — especially in colder climates — while furnaces offer faster, budget-friendly heating for homes with existing ductwork.

FAQs

Is it better to have a boiler or a furnace?

It depends on your climate and comfort needs. Boilers offer consistent, energy-efficient warmth, while furnaces are more affordable and heat faster.

Can I use propane with a boiler or furnace?

Yes. Both can be powered by propane — just make sure your tank size matches your home’s heating demand. HOP Energy offers delivery and fuel tank installation for all system types.

Which lasts longer — a boiler or a furnace?

Boilers typically last 20–30 years, while furnaces last 15–20 years with regular maintenance.

What's more energy efficient — a gas furnace vs. a gas boiler?

Both can be efficient, but boilers usually retain more heat over time. However, top-rated gas furnaces can reach higher AFUE percentages.

What costs more per month — a boiler or furnace?

Boilers tend to cost less to operate over time, especially in colder climates. Furnaces may have lower installation costs but higher ongoing fuel use.

Ready to Upgrade Your Heating System?

Whether you’re leaning toward purchasing a boiler or a furnace, HOP Energy’s experts can help you find the right fit for your home and ensure that you have an energy-efficient heating system.

Contact your local HOP Energy office today for professional furnace and boiler installation, as well as replacement, maintenance, and repair services.

Dear HOP: Busting Energy Myths

Every winter, homeowners hear all kinds of advice about heating oil and home energy use. Some of it’s helpful—but a lot of it comes from outdated information or misconceptions. We asked the experts at HOP Energy to separate what’s real from what’s just rumor.

MYTH #1: Heating oil is “dirty” and outdated

FICTION: Heating oil still produces thick soot and high emissions.

FACT: Today’s home heating oil is dramatically cleaner than in decades past — especially with renewable blends like B10 Biodiesel. These fuels reduce greenhouse gas emissions, lower sulfur output, and improve air quality. Plus, heating oil systems continue to advance, offering some of the highest efficiency ratings in the industry. Cleaner heat is already here.

Why the myth exists: Heating oil from the 1970s and ’80s was higher in sulfur. Modern fuel isn’t the same product.

MYTH #2: Oil heating systems are inefficient and costly to run.

FICTION: Oil furnaces waste fuel and need constant maintenance.

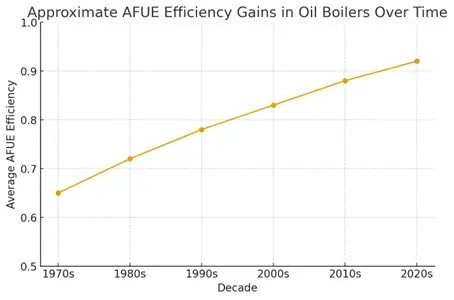
FACT: Today’s high-efficiency oil systems can operate at 90%+ efficiency, converting more fuel into heat than many alternatives. When properly maintained, oil boilers and furnaces often last twice as long as other heating systems — delivering excellent long-term value.

Why the myth exists: Old, unmaintained systems gave oil an unfair reputation.

Line chart of AFUE oil boiler efficiency gains from the 1970s to 2020s, heating energy efficiency
This chart visually illustrates the dramatic increase in heating oil boiler efficiency from the 1970s to today — moving from ~65% AFUE to 90%+ with modern condensing technology.

MYTH #3: Switching fuels is the only way to go green.

FICTION: To lower emissions, homeowners must abandon heating oil.

FACT: Renewable fuels like biodiesel blends allow heating oil customers to go greener instantly — no costly equipment changes required. Upgrading to renewable oil is one of the fastest and most affordable ways to reduce household carbon emissions.

Why the myth exists: Many consumers don’t know biodiesel is already in use across the Northeast.

Trust the Experts in Home Comfort

HOP Energy is a trusted, full-service energy provider serving homes and businesses across the Northeast with reliable heating oil delivery, propane, and expert HVAC services. With a focus on local service, energy efficiency, and customer comfort, HOP Energy is here to help you stay warm, comfortable, and prepared all year long.

Clean Heating with Biofuel: A Smarter Choice for Today and Tomorrow

Green and amber biofuel blend, clean heating with biofuel
Across the Northeast, homeowners who use oil-fired heating systems are embracing a cleaner, more sustainable option: bio-blended heating fuel. At HOP Energy, we’re proud to deliver this next generation heating solution that keeps your home warm, supports local industries, and aligns with emerging state clean-energy goals.

Table of Contents

What Is Biofuel Heating?

Simply put, bio-blended heating fuel (often referred to as “Bioheat®” when blended with ultra-low sulfur oil) is traditional heating oil blended with renewable biodiesel—made from feedstocks like soybean oil, recycled cooking oils, and animal fats. The result? A drop-in fuel that works with your existing tank, furnace or boiler—with no major equipment modifications required. (Bioheat)
For homeowners in New York State and the broader Northeast, that means you can switch to cleaner fuel while keeping the reliable warm-home comfort you expect.


In the Northeast region, forecasters and industry associations are also setting targets for higher blend levels—meaning this isn’t just a niche fuel anymore; it’s the future of home heating oil. As of now, all heating oil sold in New York State, Connecticut, Rhode Island, and Vermont all have regulations on the minimum percentage of Biofuel required to be included in all home heating fuel oil. See the table below for States in the Northeast regulating the blend percentage.

STATE
CURRENTLY
2030
2034
2035
Rhode Island
20.00%
50.00%
Connecticut
10.00%
15.00%
20.00%
50.00%
New York
10.00%
20.00%
Vermont
7.00%

Why It Matters in New York & the Northeast

For homeowners, the move to cleaner biofuel blends in heating oil means a better-performing system and a healthier environment without changing a single piece of equipment. Biofuels burn cleaner than traditional oil, which can lead to less soot, fewer service issues, and longer life for your furnace or boiler — saving money over time. They’re also made from renewable resources like plant oils and recycled materials, helping reduce carbon emissions and support American farmers and energy workers. And in many Northeastern states, including New York, homeowners may qualify for tax credits or other benefits when they use higher biofuel blends. In short, choosing heating oil with biofuels is one of the easiest ways to make your home more sustainable, efficient, and cost-effective — all while enjoying the same warm, reliable comfort you depend on every day.

Research shows that communities switching to higher-blend biofuel saw significantly reduced health risks (for example, less asthma incidence) and lower pollutant output. (nysecnow.org)
In the Northeast region, forecasters and industry associations are also setting targets for higher blend levels—meaning this isn’t just a niche fuel anymore; it’s the future of home heating oil.

Benefits You’ll See

  • Seamless transition. Your current oil-fired equipment works just fine with bio-blended fuel—no burner conversions or major tank modifications needed. (Bioheat)
  • Cleaner burn, fewer deposits. Bio-blended fuels burn cleaner, which can lead to less soot, fewer maintenance calls, and better system durability. (Bioheat Hudson Valley)
  • Support for local economy & environment. The biofuel industry supports U.S. agriculture, local supply chains and reduces dependence on foreign oil—while lowering your carbon footprint. (Bioheat)

Is It Right for You?

If you live anywhere in the Northeast and heat your home with oil, HOP Energy’s bio-blend is one of the easiest ways to improve fuel performance and reduce environmental impact—while still enjoying the comfort and reliability you value. For more details or to schedule your next delivery, contact HOP Energy and ask about our bio-blended heating fuel. Warm your home—and your conscience—with smarter heating for a cleaner future.

How to Safely Remove an Old Heating Oil Tank

If you’ve recently switched to natural gas, upgraded to a new oil tank, or discovered an unused tank in your basement, you may be wondering what to do next. Old heating oil tanks can be hazardous if left in place too long, and removal isn’t something to DIY.

Here’s everything homeowners should know about oil tank removal, disposal, and how to do it safely.

Table of Contents

Residential Oil Tank Removal

Heating oil tanks can last decades, but corrosion, leaks, and sediment buildup eventually make them unsafe. Even a small leak can contaminate soil or groundwater, leading to costly cleanup and potential environmental fines.

That’s why safe, professional residential tank removal is essential, not only for your property value, but for your peace of mind.

Removing and Disposing of Aboveground Oil Tanks

If your tank is located in a basement, garage, or outside on a stand, you have what’s considered an aboveground oil tank. These are generally the easiest and least expensive to remove.

Here’s what the process typically involves:

  1. Inspection and preparation – The tank is checked for leaks or residue. Any remaining fuel is pumped out and disposed of safely.
  2. Tank removal – Certified technicians disconnect fuel lines, remove the tank, and clean the area.
  3. Transportation and disposal – The tank is transported to a licensed oil tank recycling or disposal facility.

Professional removal ensures all local and environmental regulations are followed, which is something you can’t guarantee with DIY methods.

HOP Energy’s heating oil experts can coordinate safe tank removal or replacement as part of your heating system upgrade.

Removing and Disposing of Underground Oil Tanks

Removing an underground oil tank requires a bit more heavy lifting … literally! These tanks are often buried several feet below ground and may have been abandoned years ago.

The process typically includes:

  • Excavating the tank using specialized equipment
  • Pumping out leftover oil and sludge
  • Cleaning and cutting open the tank for safe disposal or recycling
  • Soil testing to check for contamination

If your underground tank has leaked, your removal contractor can guide you through remediation requirements in your area. HOP Energy partners with licensed specialists to ensure compliance and proper environmental reporting.

How to Dispose of an Oil Tank

Old heating oil tanks can’t be taken to your local dump or recycling center; they require special handling by licensed professionals. 

Even if the tank has already been removed/disconnected, please avoid hauling or cutting the tank yourself. It can contain flammable vapors, oil residue, or rust that poses safety risks. 

Attempting to move or cut a tank yourself is not only dangerous; it may also violate local environmental codes. Instead, hire a professional to dispose of it for you.

Who Takes Old Oil Tanks?

Only certified oil service companies or hazardous waste haulers are authorized to pump out, transport, and dispose of (or recycle) heating oil tanks.

These professionals have the right equipment to safely drain residual oil, clean the tank, and ensure all materials are properly processed. 

If you’re ready to get rid of an unused tank, HOP Energy can connect you with trusted partners who can remove your oil tank safely, efficiently, and in full compliance with environmental standards.

Recycling Old Heating Oil Tanks

Wondering if your tank can be recycled instead of thrown away? The good news is yes — most steel heating oil tanks can be taken to a certified recycling facility once cleaned and drained. The metal is processed and reused, minimizing environmental impact.

Your removal contractor or local HOP Energy office can recommend the nearest licensed recycler in your region.

Can I Leave an Old Oil Tank in My Basement?

You can … but you shouldn’t. While it’s technically legal in some areas to leave an empty tank in place, doing so can create future hazards, including:

  • Hidden leaks or corrosion
  • Odor or vapor buildup
  • Complications during property sales or inspections

If you no longer use oil heat, it’s best to schedule professional removal.

Replacing an Old Oil Tank

If you’re still using heating oil and your tank is nearing the end of its lifespan (typically 15–20 years), replacement may be a smarter option than full removal. Modern tanks are built with corrosion-resistant materials and leak prevention features for added safety.

Learn more about oil tank replacement and upgrades through HOP Energy’s heating oil tank services.

FAQs About Heating Oil Tank Removal

Q. How long does oil tank removal take?
A. Most aboveground removals take just a few hours. Underground tanks can take a day or more depending on accessibility and site conditions.

Q. Do I need a permit to remove an oil tank?
A. In many areas, yes. Your contractor or HOP Energy representative can handle the paperwork for you.

Q. What does oil tank disposal cost?
A. Costs vary based on size, location, and disposal requirements, but aboveground removals/disposals are generally much less expensive than underground ones.

Q. Can HOP Energy remove or replace an oil tank?
A. Absolutely. HOP Energy provides tank inspection, removal, and replacement services across the Northeast, ensuring your system stays safe and compliant year-round.

Trust HOP Energy for Safe Oil Tank Disposal

When it’s time to retire your old heating oil tank, trust the professionals who know home heating best. From inspection to disposal, HOP Energy makes the process simple, safe, and compliant with local environmental standards.

Contact your local HOP Energy office today to schedule an estimate or learn more about our oil tank removal and replacement services.

Dear HOP: Your Home Comfort Questions Answered

Introducing Dear HOP — a candid look at the real questions our customers ask us every day and the honest answers they get from our trusted HOP Energy team. From fuel delivery to home comfort tips, this article offers practical advice based on real conversations, helping you stay informed, prepared, and comfortable all year long.

Q: What kind of financing does HOP have for a new AC or mini-split system? I need a new one and I'm not sure I can hold out until end of summer, but money is a bit tight.

A: HOP Energy offers a variety of flexible financing options and payment plans for ALL our equipment, including new AC and mini-split systems, so you can get the comfort you need without delay. Our team can walk you through payment plans that fit your budget, including zero-down and low monthly payment options for qualified customers. We recommend speaking directly with one of our knowledgeable reps, who will review your home’s needs, explain your system choices, and guide you through the financing options that work best for you. Let’s schedule a free in-home or phone consultation to get you started whenever you’re ready.

Q: I have an AC window unit now, but it’s loud and getting old and expensive. A friend recommended I replace it with a mini-split, but don’t know a lot about them. Are they a good choice?

A: Great question, and you’re definitely not alone in thinking about switching! Many homeowners are switching from old, noisy window units to modern mini-split systems because they’re much quieter, more energy-efficient, and can cool or heat specific rooms effectively. They also free up your windows, look cleaner inside your home, and help lower energy costs while keeping you comfortable. Best of all, you won’t have to go through the hassle of installing and removing your AC unit every year—mini-splits stay in place and work year-round. Plus, many of our models provide heating, giving you year-round comfort all in one system. One of our reps would be happy to take a look at your home and walk you through how a mini-split could work for your space, including system options and financing if needed.

Q: Is summertime a good time to stock up on heating oil? I don't need it right now, but are prices cheaper during summer?

A: Many customers in the Northeast do choose to stock up on heating oil during the summer because prices often tend to be lower when demand is down. While prices can still fluctuate based on market conditions, topping off your tank in the off-season can help you be prepared for fall and winter before the rush, while potentially saving on your cost per gallon. Plus, it’s one less thing to worry about when the cold weather returns!

About HOP Energy

HOP Energy is a trusted, full-service energy provider serving homes and businesses across the Northeast with reliable heating oil delivery, propane, and expert HVAC services. With a focus on local service, energy efficiency, and customer comfort, HOP Energy is here to help you stay warm, comfortable, and prepared all year long.